Setup wizard
The setup wizard opens the first time you visit a new install. It takes you from a fresh helm install to a working control plane: a root user, a platform org, a connected forge, a gitops repo, and Argo CD syncing it. Most of it is a few fields and a button per step, and you can close the browser at any point and come back: the wizard reads where the install is every few seconds, so it always opens on the step that is next.
The steps are listed down the left side, and each page says which step of how many you are on. Each step moves the Installation infrared to its next phase, which you can also watch from a terminal:
kubectl --context <your context> get installation infrared -w
| Step | What you do | Installation phase while it waits |
|---|---|---|
| 1 | Verify setup token | AwaitingToken |
| 2 | Create platform admin | AwaitingAdmin |
| 3 | Name the platform org | AwaitingOrg |
| 4 | Confirm management cluster | AwaitingCluster |
| 5 | Connect GitHub, or Connect a forge when the install runs Gitea | AwaitingGitProvider |
| 6 | Hydrate gitops repo | AwaitingGitopsRepo |
| Set up backups, optional | Syncing | |
| 7 | Sync with Argo CD | Syncing, then Ready |
Every step is also an API call under /v1/setup, so you can script the wizard instead: see Scripted setup.
1. Verify setup token
The chart writes a one-time setup token to the Secret infrared-setup when it installs. Presenting it proves you operate the management cluster. Read it with:
kubectl --context <your context> -n infrared get secret infrared-setup -o jsonpath='{.data.token}' | base64 -d; echo
Paste it into Setup token and choose Verify setup token. The token works only until the root user exists.
Your browser keeps the token for 24 hours. If you go on in another browser, or in one that never presented it, the wizard asks for it again (Verify setup token in this browser) before it lets you create the root user.
2. Create platform admin
The first platform admin is the root user. It is a break-glass account, not a person: it finishes setup, and later signs in when Google can't. Its password belongs in your break-glass vault, a vault in your password manager that only the people who may break glass can open. Before this step, generate the password there, 32 characters or more, and save it.
Under Root user, enter an Email, such as [email protected], and paste the Password, which must be 20 to 72 characters. Choose Create platform admin. Infrared keeps only a one-way hash of the password and signs you in. It never generates a password for you, and never writes one to a Secret, a log or a response.
Everyone else signs in with Google once a platform admin allows their Google Workspace domain, or with GitHub once their login is on an access group. See Access groups and access.
From here on, the wizard needs you signed in. If your session ends (sessions last 12 hours), the wizard shows the current step with a Sign in form for the root user: choose Sign in and continue setup.
Scripted setup
ir setup run -f infrared.yaml runs the wizard's steps from the setup section of your install file, and ir install --setup does the same right after the helm install. Steps already done are left as they are, so you can run it again after fixing a failed step.
For this step, ir reads the root password from the file setup.admin.passwordFile names, so infrared.yaml never holds a password. Without one, it sends a throwaway password it makes in memory and never prints, logs or writes down. Right after this step it mints an API token for your machine, saves it, and runs the remaining steps with the token. Infrared records the mint as a use of the root user.
Set the real root password afterwards, from your vault: ir open /access signs a browser in as the root user with that token, and Access → Break glass changes the password. A platform admin signed in with Google can change it too.
A GitHub App can only be created in a browser, so with setup.forge: github the run stops at step 5. Finish Connect GitHub in the wizard, then run ir setup run again for the rest. With setup.forge: gitea, the whole setup runs from the file. See Install on GKE.
3. Name the platform org
The platform org owns the management cluster and the gitops repo. Enter an Org name: it becomes the org's namespace, ir-org-<org>, so it must be a lowercase DNS label of 56 characters or fewer. Display name is optional and shows in the rail's org switcher; it defaults to the name. Choose Create platform org.
Infrared creates the org and its namespace, and seeds it with the default AgentRole catalog and its AgentWorkflows. The platform org can't be renamed afterwards.
4. Confirm management cluster
Infrared shows the cluster it detected itself running on: its name and health, its Type (management cluster), its Distribution (the flavor, such as eks, and the Kubernetes version), its Provider (such as gcp or aws, with the region) and its Nodes. Cluster name is filled in from the chart value managementCluster.name, which becomes the folder registry/clusters/<cluster>/ in your gitops repo. Choose Confirm management cluster.
The field confirms the cluster Infrared already knows; it can't rename it. To use a different name, reinstall with a different managementCluster.name before you finish the wizard.
5. Connect GitHub
Infrared creates a GitHub App in your GitHub organization and uses it to manage the gitops repo, read your product repos and open pull requests. Nothing is granted until you install it. The step has two parts.
1. Create the GitHub App. Enter the GitHub org: the organization that will own the gitops repo and your product repos. App name shows the name Infrared gives the App, infrared-<platform org>, cut to GitHub's 34-character limit.
2. Install it. The step lists the permissions the App asks for, and why:
| Permission | Access | Why Infrared needs it |
|---|---|---|
contents | Read and write | Commit to the gitops repo; read product source for AgentRoles |
pull_requests | Read and write | Open pull requests and agent-authored changes |
issues | Read and write | Backlog, hydration and release planning |
administration | Read and write | Create the gitops repo |
workflows | Read and write | Commit files under .github/workflows when hydrating the gitops repo |
checks | Read | Gate promotion on CI results |
metadata | Read | List the org's repos; GitHub requires it for every App |
members | Read and write | Keep the GitHub teams mapped to Infrared's access groups in step |
Then:
- Choose Create GitHub App. Your browser goes to GitHub with the App's manifest filled in: its name, the permissions above, and the addresses GitHub sends you back to.
- On GitHub, create the App. GitHub hands its ID, private key and secrets to Infrared, which keeps them in the Secret
github-appin the namespaceir-org-<platform org>, and sends you on to install it. - Install the App on your GitHub organization. It needs to create the gitops repo, so choose All repositories.
- GitHub sends you back to the wizard, which marks the App Created and Installed. If you left before installing, Install on GitHub takes you back.
Keep the tab open while you are on GitHub: the wizard picks up where it left off when you come back. Once the App is installed, choose Hydrate gitops repo to go on.
The App's private key, webhook secret and sign-in client stay in the Secret github-app. Restrict who can read the platform org's namespace.
The webhook and the sign-in callback
GitHub only accepts addresses it can reach from the internet. When you open Infrared on a private address, such as a kubectl port-forward to localhost, the App is created without a webhook or a sign-in callback. On a public address, it gets both, but the webhook starts inactive and subscribed to no events. Either way, once Infrared has its public address, activate the webhook so AgentWorkflows can start on issues and pull requests, and make sure the App has the callback for Sign in with GitHub. Settings → GitHub App shows both addresses, with Copy buttons, and walks you through it:
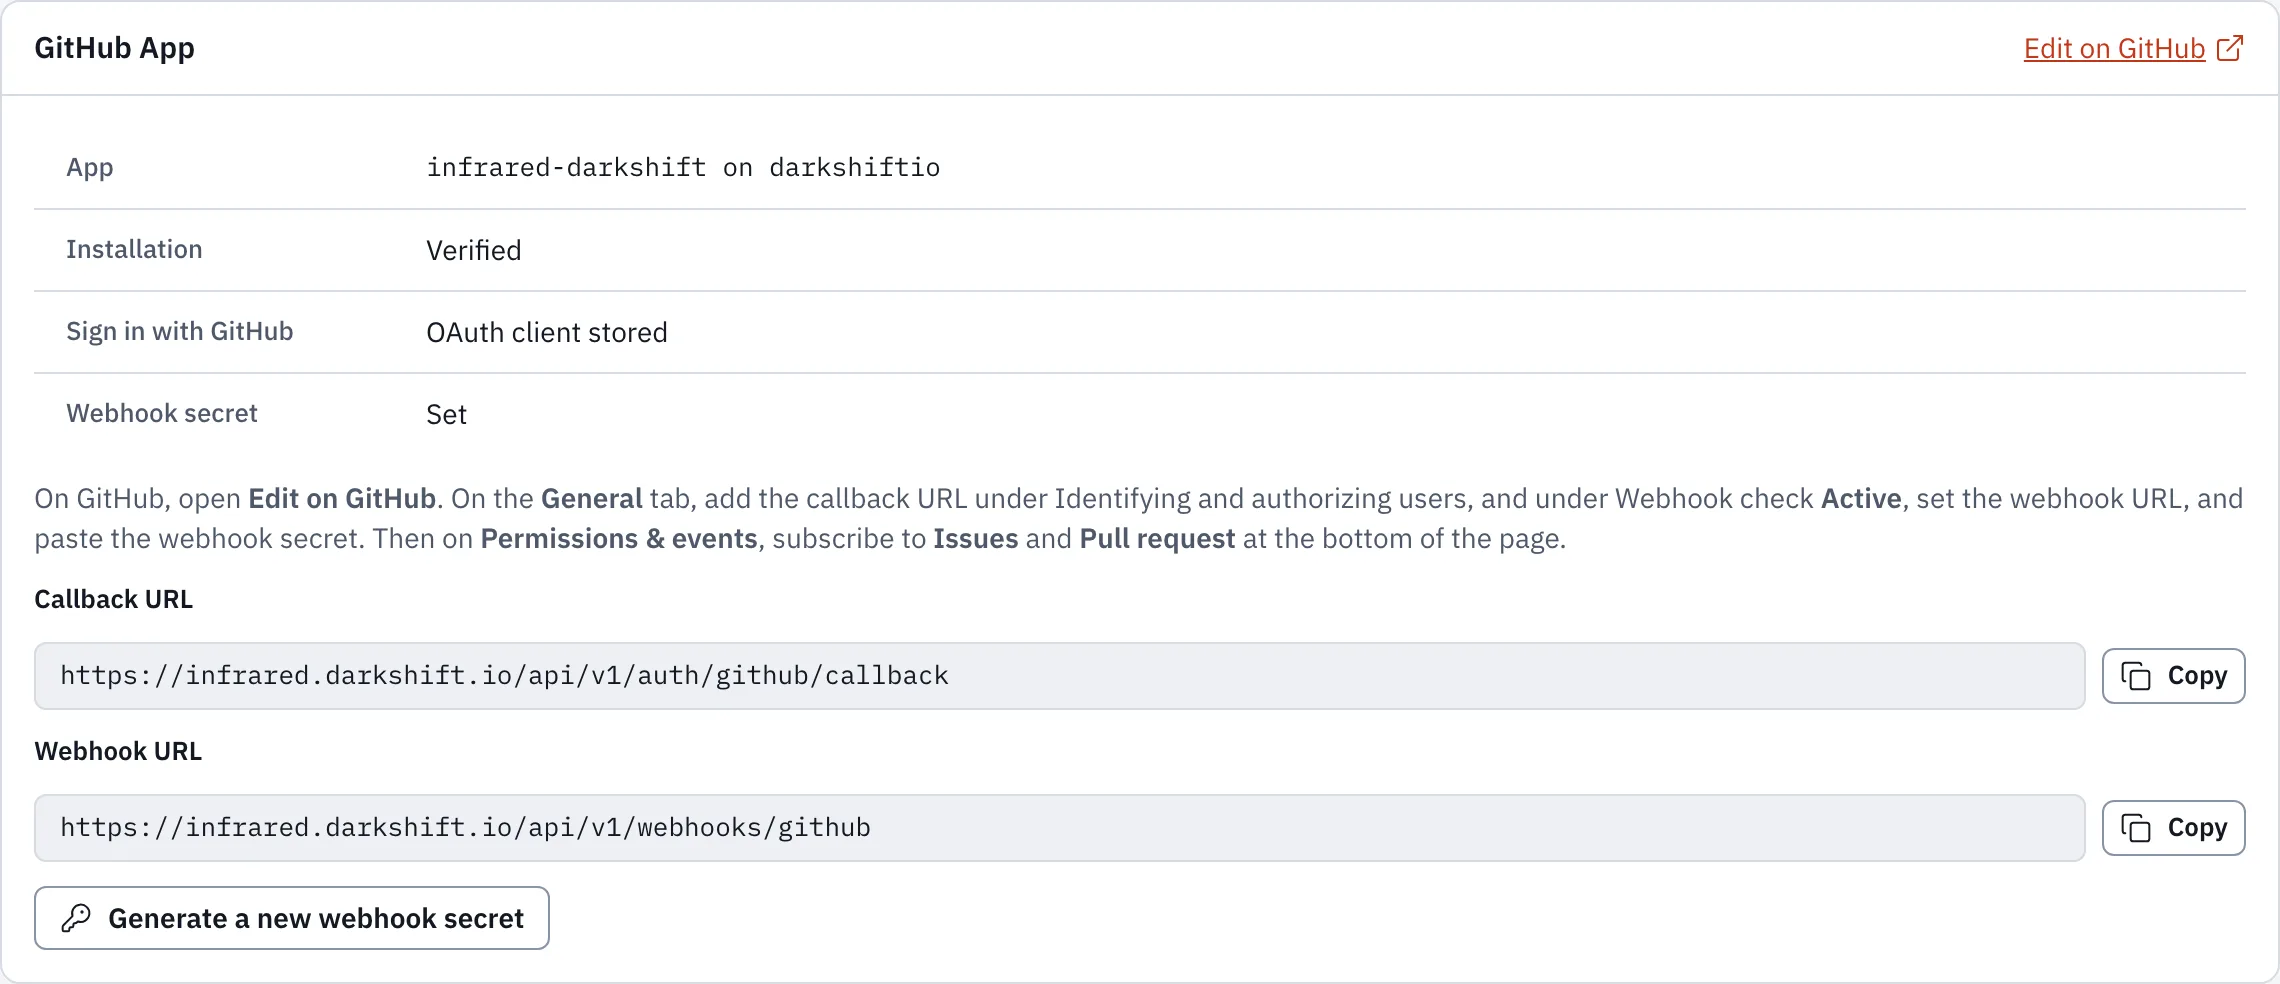
See Connect the webhook and Sign in with GitHub.
Gitea instead of GitHub
When the install runs Gitea (the chart value gitea.enabled), this step is called Connect a forge and offers Gitea first. Infrared keeps the gitops repo and your product repos in that Gitea, on the management cluster, with no GitHub organization or GitHub App.
Enter the Gitea organization that will hold them (Infrared creates it if it is missing) and choose Create Gitea organization. Gitea user shows the user Infrared acts as, ir-<platform org>, which owns the organization; its password and tokens stay in the Secret gitea in ir-org-<platform org>. Gitea allows user names of at most 40 characters, so a platform org whose name makes a longer one has to use GitHub. Use GitHub instead switches to the GitHub App, and Use Gitea instead switches back.
The platform org can also connect a GitHub organization later, beside Gitea, in Settings → GitHub, and each Product then picks its forge. See Organizations.
6. Hydrate gitops repo
Choose the Repository name (default gitops) and its Visibility: Private (the default), Internal (needs GitHub Enterprise Cloud) or Public. Gitea keeps repos private or public only. Choose Hydrate gitops repo.
Infrared creates the repo on your forge and commits a pinned version of infrared-gitops-template to it, the chart's gitops.templateVersion. This takes a few seconds. The repo gets:
- the gitops catalog of components, chosen for the cluster's flavor, under
components/; registry/clusters/<cluster>/components/, with one Argo CD Application per component, each with its sync wave;- the app-of-apps root Application,
registry-<cluster>.
Infrared then installs Argo CD, gives it read access to the repo, and applies the root Application.
If the repo is still not hydrated after a minute, the wizard says so and names the command that shows why, kubectl -n ir-org-<org> describe gitopsrepo gitops. Fix what its conditions report, then choose Hydrate gitops repo again.
Set up backups
Once the gitops repo is hydrated, a platform admin sees the optional step Set up backups, ahead of the sync. Argo CD keeps syncing meanwhile. It is the same form as Settings → Backups: where each backup goes, outside this cluster, how it is made, and who can open it. Fill it in and save, or choose Skip for now and set it later in Settings. The step is done once backups are set, by this form or by the chart's backup values, or once you skip it in this browser. See Back up and restore.
7. Sync with Argo CD
Argo CD now applies registry/clusters/<cluster> wave by wave. The wizard shows three tiles:
- Applications: how many are Healthy out of the total, and how many are Progressing, Degraded or Missing;
- Next layer: the first layer of the platform that is not ready yet, and what it waits for;
- Gitops repo: the hydration commit, the repo's phase and the template version.
Below them, the platform is shown layer by layer, in the order it becomes available: Infrared, Version control, GitOps, Secrets, Certificates, Edge and DNS, Databases, Object storage, Registry, Agent runtime, Build runtime, Observability and Backups. Each layer is ready, partly ready or not ready, and says what holds it up. The Sync waves tab shows the same Applications by sync wave instead, each with its sync status (Synced or OutOfSync) and health (Healthy, Progressing, Degraded, Suspended or Missing). Open gitops repo opens the repo on GitHub.
At wave 40, Argo CD adopts Infrared itself: the helm release you installed becomes an Application in your gitops repo, and the Secrets the chart generated are kept. At wave 100, Argo CD starts managing itself. When every Application is Synced and Healthy, the install is Ready and Open Products takes you into Infrared.
A few minutes of Progressing is normal while images are pulled and databases start. If a layer doesn't move, see Troubleshooting.
Restoring instead
When you restore an install from a backup onto new servers with ir restore, the wizard shows the restore's stages in place of its steps until the restore is done. See Back up and restore.
After the wizard
From now on you sign in on the sign-in page. Until Sign in with Google is set up, the root user signs in with its email and password, and people on an access group use Sign in with GitHub. Once a platform admin sets up Sign in with Google, the page leads with Sign in with Google, and Other ways to sign in holds Sign in with GitHub and the root user's form.
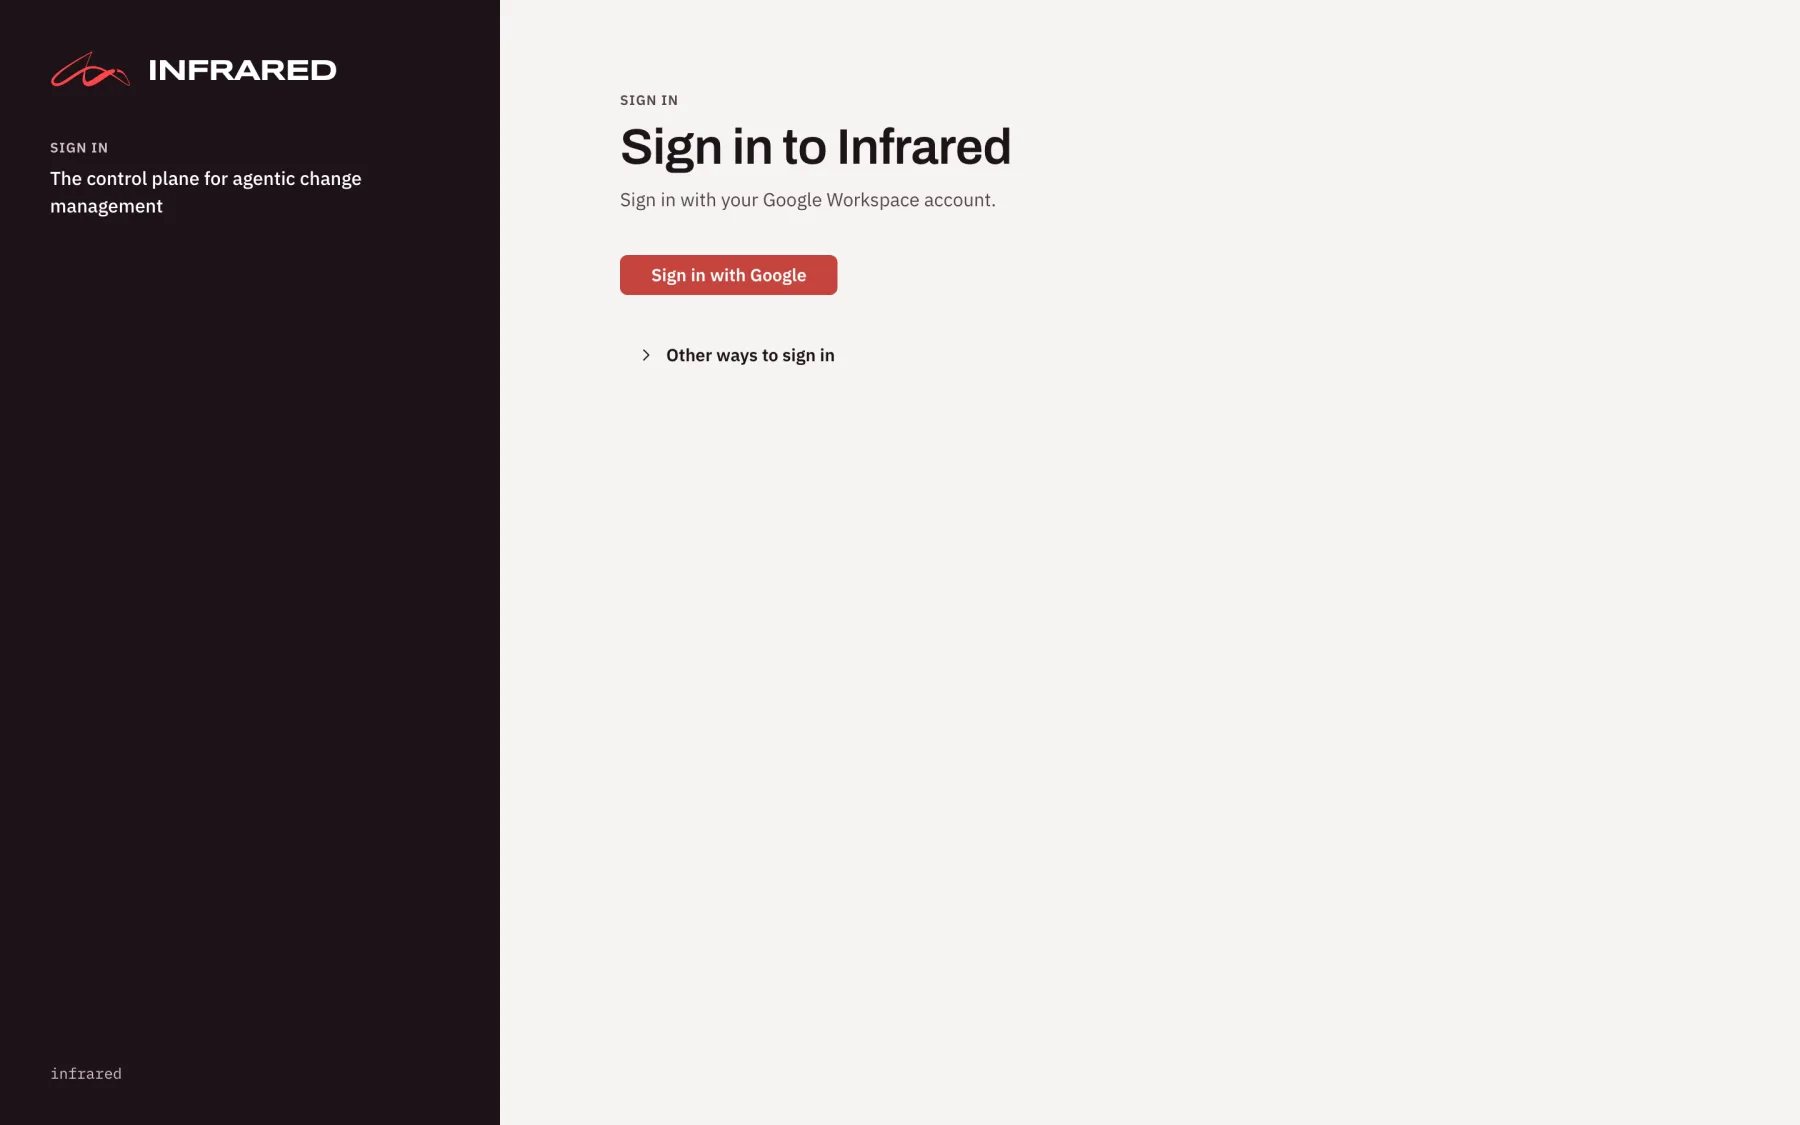
Then, in this order:
-
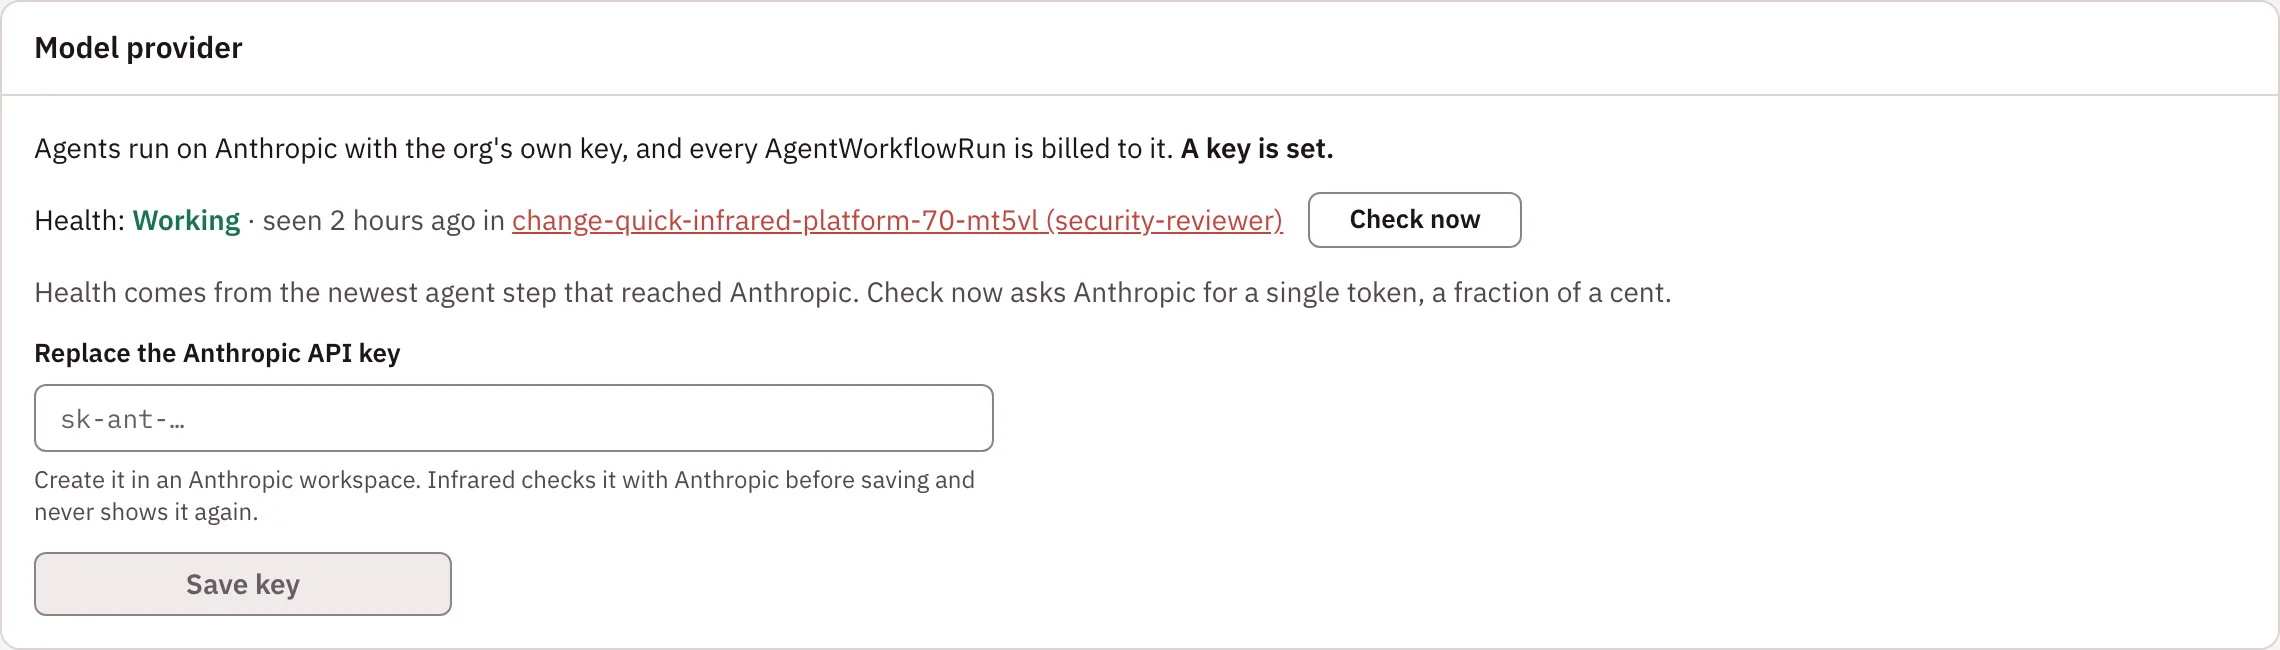
Set the org's model key. Agents run on Anthropic with each org's own API key, and agent runs can't start until one is set. In Settings → Model provider, paste an Anthropic API key made in a workspace in the Anthropic Console, and choose Check and save key. Infrared checks the key with Anthropic before it saves it, and never shows it again. Check now confirms the key has credit. If agent runs stop because the key is out of credit or rejected, a banner on every page says so.
-
Set up Sign in with Google, then access groups. Allow your Google Workspace domain, map the platform org's
platform-adminaccess group to a Workspace group you are in, and map each org's access groups in Workforce → Access groups. Then link your GitHub account on You, the page your name opens at the foot of the rail. People who don't sign in with Google go on access groups by their GitHub login. See Access groups and access. -
Set up backups, if you skipped them: Settings → Backups. Until a destination, its key and a recipient are set, no backup is made. See Back up and restore.
-
Record where the root password lives. In Access → Break glass, add the link to your break-glass vault and the Workspace group of the people who may open it. See Break glass.
-
Read your AgentRoles. Workforce → Agents lists the catalog seeded into the platform org, ready to read and edit. See AgentRoles, AgentWorkflows and AgentWorkflowRuns.
Infrared is now managed by gitops. To upgrade it, merge a pull request that changes its version in the gitops repo. Don't run helm upgrade: Argo CD reverts it on its next sync. See Upgrades.
When you are ready, create your first Product and ask for your first Change.